Layers of flaky, buttery pastry

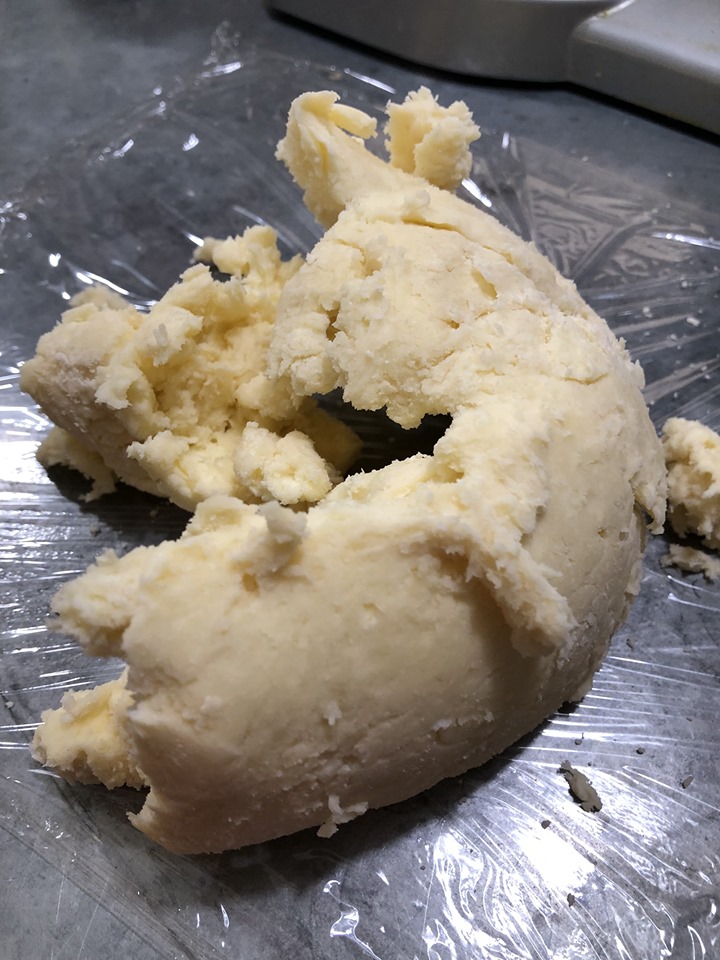
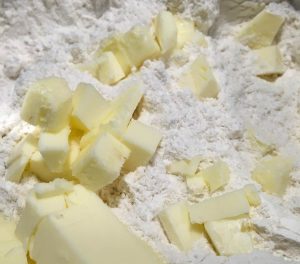
I came home from teaching thinking I’d knock out the croissant lamination, no problem. Well, first off, it turned out I hadn’t made my dough square quite large or square enough. So I took the butter square off to try again. More rolling.

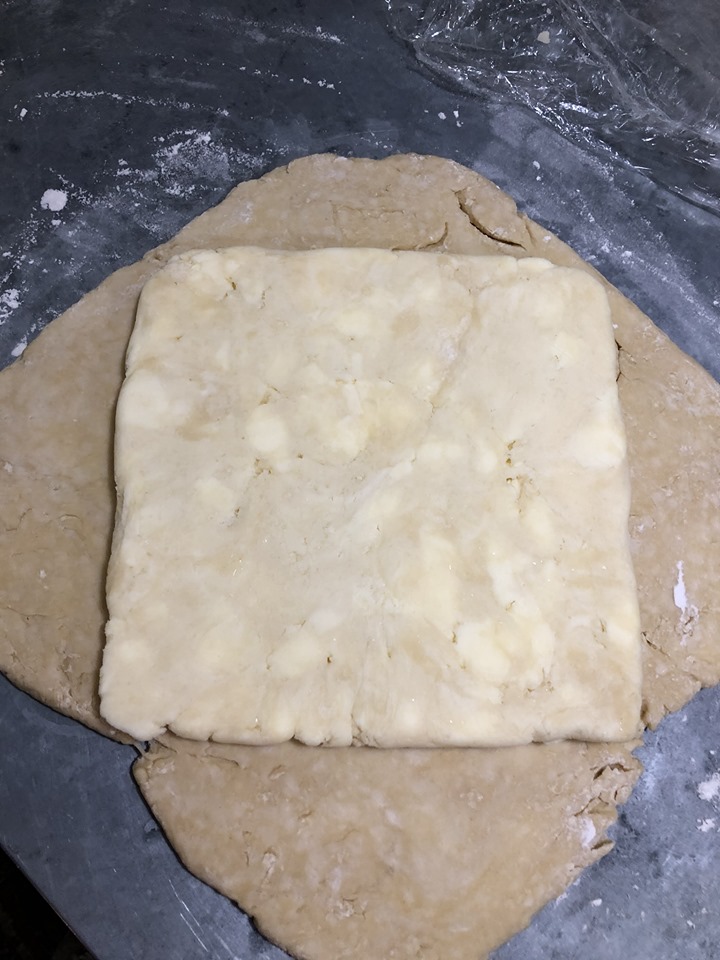
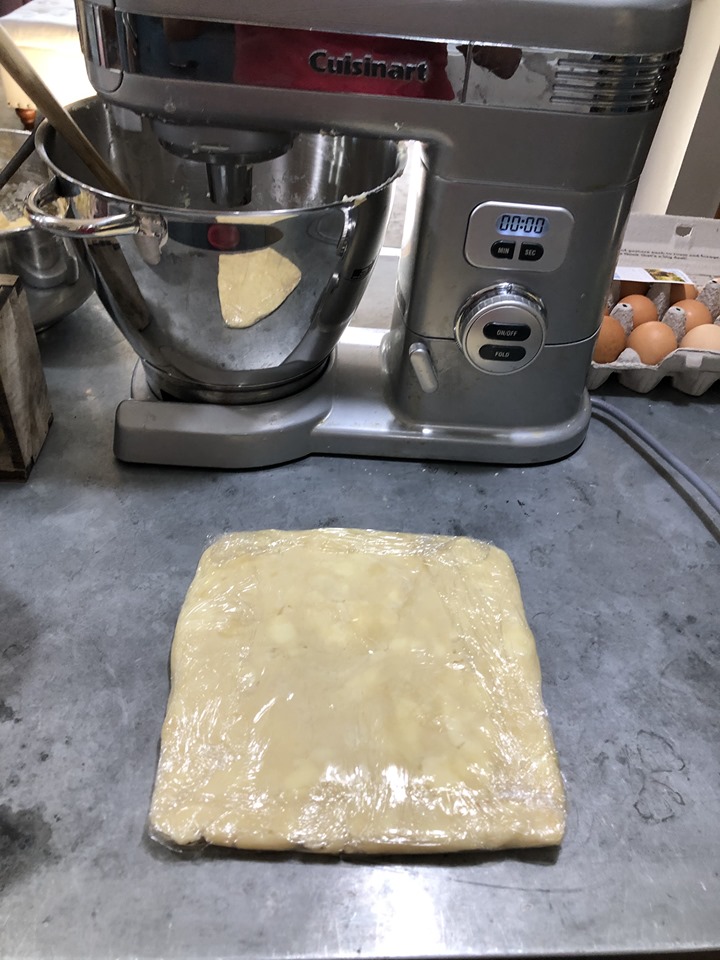
Second roll got it square enough, so I put the diamond of butter inside the square, folded over the triangles (like making an envelope), and pinched them sealed. Easy-peasy. Next — flipping it over and rolling it until it measured 10″ x 20″. I have to admit, having looked at the rest of the recipe by this point and seeing just how often it asked for measurements, I caved and went down to the basement to get a ruler. [shakes fist at the French] It took a while, and my shoulder muscles had started to ache, but I did it, finally. 10″ x 20″, achieved.

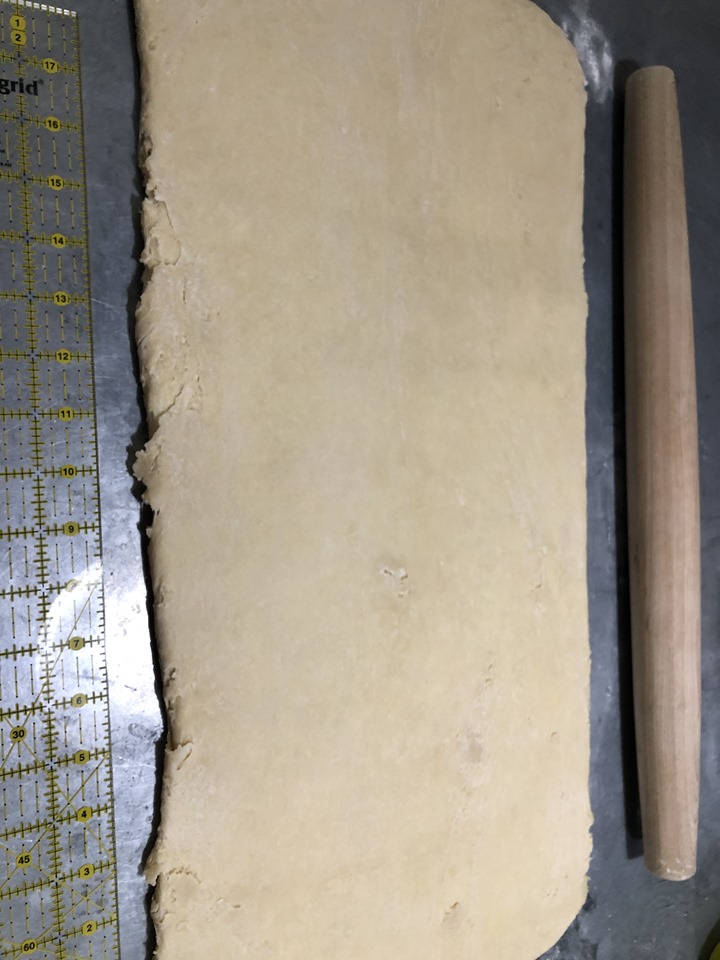
Next step, fold it over in thirds, like a business letter. No problem. Flip and turn and…roll it out to 10″ x 20″ again? Okay, I can do that. It went a little easier this time, as the dough wasn’t quite as chilled, but I feel like a wimp admitting that I was super-tired by the end of this roll. I think I still have some sort of stupid lingering cold, as I have been weirdly exhausted for much of the last week (weeks?).

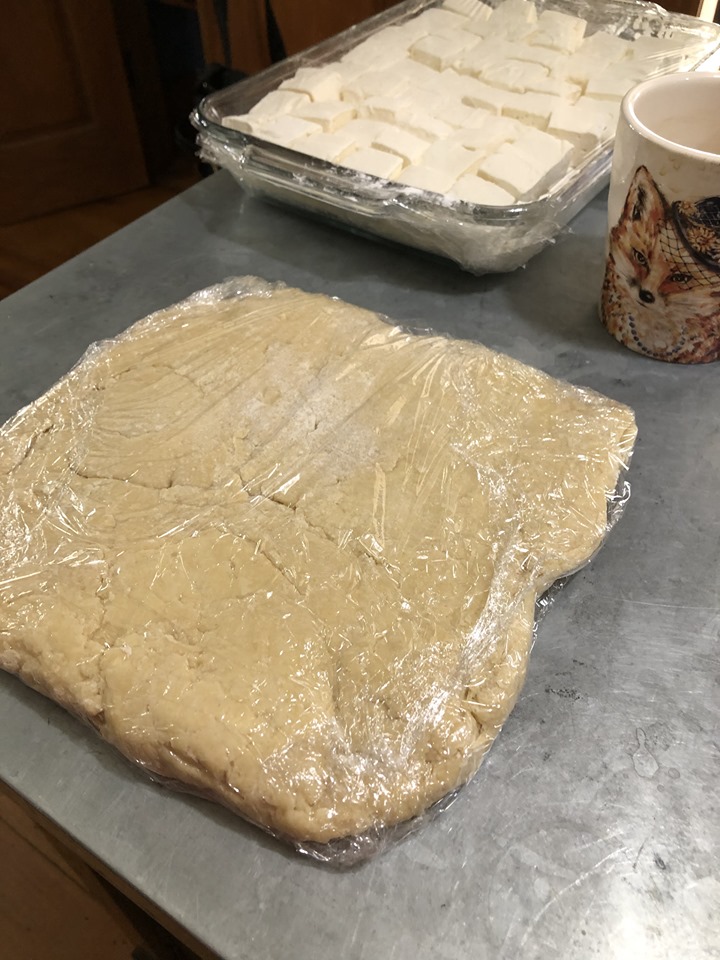
I did the roll out, folded it in thirds again, wrapped it and put it back in the fridge to chill for 30 minutes, sat down on the couch to look at the recipe again. Two MORE turns and rolls? Seriously? How many layers of flaky, buttery pastry does one person need?

ALL. I need ALL the layers. But I acknowledged that I had hit the point of tiredness where this was starting to be no longer fun, and there is no point in this kind of nonsense unless you are also having fun, so I paused for the night. Croissant-finishing would have to wait another day. Instead, I took myself to bed with a few episodes of dumb interior design TV and called it a night.

Croissantathon

Croissant-making hurdle #1 — Kevin insists that the brewer’s yeast he has on hand will work just fine in bread-making, and that that jar of active dry yeast we have is very old and I shouldn’t risk it. I trust my husband, right? Right. Onwards.

Croissants, next step. So far, so good. Mix eggs, warm water, flour, sugar, yeast. This is totally within my power. I am a baking god.

Croissants, step 3. I let the frozen butter sit for about an hour, so it was no longer hard as a rock, but still cool to the touch. Sliced and into the mixing bowl. Is that enough butter for ya?

Croissants, next step. Mix butter with salt and flour in a stand mixer. Um, I used the dough hook (think maybe the paddle attachment would’ve been better), and ended up having to do a lot of shoving butter down towards the center with a spatula, which I don’t remember ever seeing them do on GBBO; am starting to question my baking god qualifications.

Still, looks all right?

8 inch square of butter mixed with flour. When we say 8 inches, we mean that I held up a 8.5 x 11 sheet of paper and eyeballed it from there, because I don’t actually keep a ruler in my kitchen because I am not as obsessive as the French, and I am also too lazy to go down to my craft table in the basement and get one. But that looks vaguely right, I think. Into the fridge to chill for 30 minutes.

Ha ha ha! You thought we surely had ENOUGH butter with the pound of butter that we just sliced up. Don’t be ridiculous. Of course you have to melt MORE butter and pour it over the ‘sponge’ as they call it. MOAR BUTTER.

Um. This seems very dry. And crumbly. I’m supposed to have it come together into a dough, and then knead five minutes, adding a little four if it’s too too sticky at that point. It is not too too sticky at that point. It is super-dry at that point, and has still not come together into a dough. Also, my arms are aching from five minutes of kneading because I made the mistake of doing it up on the island instead of the kitchen table, so I don’t have as good an angle as I could have and also, I almost never make bread and am really out of practice with the whole kneading thing.

I gingerly add some warm water (about 1/4 c.), fearing disaster, as this is NOT in the instructions. And that was too much — the dough finally comes together, but now it’s decidedly sticky, sigh. Should’ve been more conservative, tried a T or two instead. GAH.

(No photo of the sticky portion, as my hands were covered in goop. As it was, my phone was getting a little more flour-y than was perhaps wise, but seems to have survived, whew.)

Okay. I think I salvaged it. A few more T of flour, and it came together into a reasonable dough, and it’s now shaped into a 9″ square (and yes, I eyeballed this one too, what kind of obsessive baker do you think I am? (There is a reason I’m more of a cook than a baker. Precision is NOT my thing.)), wrapped, and delivered safely into the fridge to chill for 30 minutes.

Just one problem; in 15 minutes, I’m supposed to be across town at Oak Park Works, teaching publishing and writing for the next 3 hours. So I’m going to go do that, and hope that an extra 3+ hours of chilling doesn’t hurt either the butter or the dough. It’ll be fine, right? And when I get home, experiments in lamination — hopefully my sore arm muscles will have recovered by then.

(This may be the most elaborate thing I’ve ever baked. Are flaky, buttery layers worth it? Hmm….)

Croissant-making challenge, and passionfruit marshmallows

In theory, I’ve agreed to join Pooja Makhijani’s croissant-making challenge this weekend. She suggested I plan to laminate my dough on Saturday and shape and bake on Sunday.

That would’ve been wise, I’m sure, but yesterday I actually made two batches of passionfruit marshmallows and one of milk toffee, in preparation for shipping out Feast with Kickstarter goodies (also so I could take some milk toffee to Madhurima’s Diwali party last night, where it was honestly entirely unnecessary because she made a massive amount of delicious food including homemade chai and mango ice creams, and yes, I’ve told Kevin that he should seriously consider an ice cream maker for my Christmas present this year).

Anyway, I am just now about to even look at the recipe Pooja sent me, so this is likely to be a disaster, esp. as I have never even attempted croissants before. But onwards unto the breach, dear friends! Disastrous croissants await.

(I mean, how bad could they be, really? With all that butter….)

#serendib
#blog
#croissantathon

Pumpkin-Toffee Scones with Jaggery Drizzle

Pumpkin-Toffee Scones with Jaggery Drizzle

These little bites of heaven were designed to appeal to my daughter, who can be quite resistant to trying new foods. When I brought one upstairs for her to try, she initially refused. I broke off a small piece and asked her to please try it, that I’d designed it especially for her, with flavors I thought she’d love. Kavya hesitated, but unwilling to disappoint her mother entirely, eventually took it. A few minutes later, she asked for the rest, please.

Kavi then admitted that she hadn’t wanted to admit that I was right, but it was too good, so she had to give in. She’s twelve-and-a-half now; the tween years are…interesting. Two strong-willed women in one house. 🙂

This is another scone where I was aiming for autumnal + South Asian. My pumpkin spices are a little punchier than you might find in most American recipes, with cardamom and ginger added to the classic cinnamon, nutmeg, and cloves. The jaggery drizzle adds a molasses-like complexity; Kavi and I like our drizzle with some lime, because we are all about the tang. The brightness of the lime highlights the pumpkin in beautiful ways; I love this scone with a cup of chai.

But straight up sweetness (Anand’s preference) works here too, pairing with the toffee bits; if you were going to have this with black coffee, for example, you might be just fine with a pure jaggery drizzle. Feel free to also skip the drizzle entirely; the pumpkin-toffee scone will still be delicious, especially warm, slathered with butter.

2 3/4 cups flour
1/3 cup sugar
1/2 teaspoon salt
1 tablespoon baking powder
1/2 cup cold butter
1/2 c. toffee bits

1/2 c. pumpkin puree (blot with paper towel if watery)
1 large egg
1 teaspoon vanilla
1 teaspoon cinnamon
1/2 teaspoon ground ginger
1/4 teaspoon ground cardamom
1/4 teaspoon nutmeg
1/4 teaspoon of cloves
1/2 cup milk

Jaggery Drizzle:
1/4 c. jaggery, dissolved in 1/4 c. boiling water
1 T lime juice (optional)

1. Preheat oven to 375F. Spray mini scone pan with Baker’s Joy (or butter and flour pan, which will be kind of a pain). Alternately, cut and shape these by hand, and bake on a regular baking sheet, placing them quite close together. If you pop them in the freezer for 30 minute before baking, they’ll hold shape better.

2. Mix dry ingredients in a large bowl. Chop butter in small pieces and cut into flour with a pastry cutter (or with your fingers) until mixture resembles coarse meal. (It’s fine to have small lumps.) Stir in toffee bits.

3. In a medium bowl, beat eggs lightly and combine with remaining 9 scone ingredients. Pour into dry mixture and stir with a fork until a soft dough forms.

4. Turn out onto a lightly floured board and knead a few times. Cut into 16 equal pieces and press into the cavities of the pan.

5. Bake 20-25 or until medium brown. Let cool 20 minutes in pan, then remove from pan to wire rack and cool completely. Serve warm, with coffee or tea.

6. Optional: Jaggery drizzle. Dissolve jaggery in boiling water, add lime juice if desired, and pour over scones.

Autumn Scones with Candied Ginger and Dried Cherries

Autumn Scones with Candied Ginger and Dried Cherries

After visiting Dublin, I’m a little scone-obsessed. All the cafes offered scones, and they were generally so much tastier than the ones we get in America, sigh. These were for Kevin’s birthday, as ginger and cherries are two of his favorites.

I included a glaze option for these, but I didn’t glaze mine, as I don’t like scones very sweet — these are perfect served warm with a thick slathering of butter. If you do want sweet, a little cranberry-raspberry jam goes quite nicely. And tea or coffee, of course!

(If you don’t have a mini scone pan, you can cut and shape these by hand, and bake on a regular baking sheet, placing them quite close together. If you pop them in the freezer for 30 minute before baking, they’ll hold shape better.)

2 3/4 cups flour
1/3 cup sugar
1/2 teaspoon salt
1 tablespoon baking powder
1/2 cup cold butter
1/2 c. chopped candied ginger
1/2 c. chopped dried cherries
2 large eggs
1 teaspoon vanilla
1/2 cup milk

Glaze:
3 1/2 c. powdered sugar
7 T water

1. Preheat oven to 375F. Spray mini scone pan with Baker’s Joy (or butter and flour pan, which will be kind of a pain).

2. Mix dry ingredients in a large bowl. Chop butter in small pieces and cut into flour with a pastry cutter (or with your fingers) until mixture resembles coarse meal. (It’s fine to have small lumps.) Stir in ginger and cherries.

3. In a medium bowl, combine remaining 5 scone ingredients, beating eggs lightly. Pour into dry mixture and stir with a fork until a soft dough forms.

4. Turn out onto a lightly floured board and knead a few times. Cut into 16 equal pieces and press into the cavities of the pan.

5. Bake 20-25 or until medium brown. Let cool 20 minutes in pan, then remove from pan to wire rack and cool completely. Serve warm, with coffee or tea.

6. Optional: Glaze. In a medium bowl, combine powdered sugar and water. Line a baking sheet (with sides) with parchment. Pour glaze in, then dip scones in glaze. Remove to wire rack to dry. Alternately, drizzle glaze over the top.

Pistachio & Rosewater Mini Scones

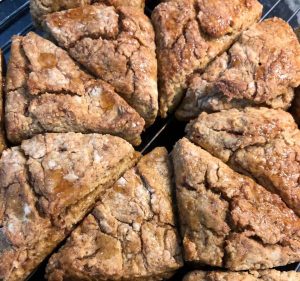
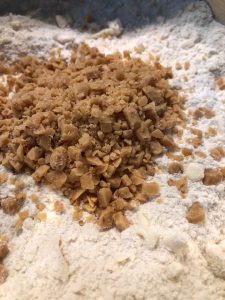
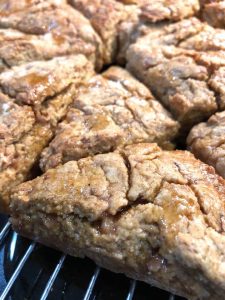
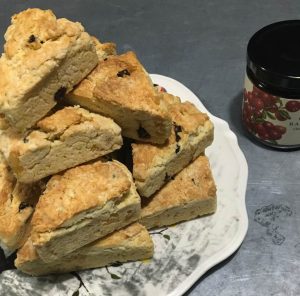
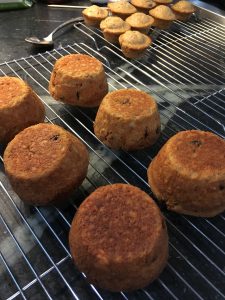
Delicate and fragrant, with a little nutty goodness to add to your morning or teatime. (If you don’t have a mini scone pan, you can cut and shape these by hand, and bake on a regular baking sheet, placing them quite close together.  If you pop them in the freezer for 30 minute before baking, they’ll hold shape better.)
 
2 3/4 cups flour
1/3 cup sugar
1/2 teaspoon salt
1 tablespoon baking powder
1/2 cup cold butter
1/2 c. chopped pistachios
1/2 c. dried edible rose petals
2 large eggs
1 T rosewater
1 teaspoon vanilla
1/2 t. lime zest
1/2 cup milk
 
Glaze:
3 1/2 c. powdered sugar
6 T water
1 T lime juice (or substitute water for a plain sugar glaze)
 
1. Preheat oven to 375F. Spray mini scone pan with Baker’s Joy (or butter and flour pan, which will be kind of a pain).
 
2. Mix dry ingredients in a large bowl. Chop butter in small pieces and cut into flour with a pastry cutter (or with your fingers) until mixture resembles coarse meal. (It’s fine to have small lumps.) Stir in pistachios and rose petals.
 
 
3. In a medium bowl, combine remaining 5 scone ingredients, beating eggs lightly. Pour into dry mixture and stir with a fork until a soft dough forms.
 
4. Turn out onto a lightly floured board and knead a few times. Cut into 16 equal pieces and press into the cavities of the pan.
 
5. Bake 20-25 or until medium brown. Let cool 20 minutes in pan, then remove from pan to wire rack and cool completely. Serve warm, with coffee or tea.
 
6. Optional: Glaze. In a medium bowl, combine powdered sugar, water, and lime juice. Line a baking sheet (with sides) with parchment. Pour glaze in, then dip scones in glaze. Remove to wire rack to dry. Alternately, drizzle glaze over the top.

Keto ‘Naan’

Made coconut flour keto ‘naan’, out of curiosity. It’s not naan, but it’s good! A little odd, and definitely soft — you have to be careful flipping it, or it will tear / mush. The texture isn’t really bread-like — closer to injera, maybe.

But I actually kind of love the sweetness of the coconut with a tangy pork curry. If you’re looking for a gluten-free (or higher-fiber) desi bread-like option, this is a good one; I might even make it again myself.

Desi-Spiced Carrot Bread

Our farmshare is producing quite a lot of carrots at the moment, so I’ve turned to quick bread. The nice thing about it is that you can make a double or even quadruple batch, and it takes just about as long to make, and then you have lots to freeze for a hungry day or give away. This quick bread is a pretty healthy option for breakfast or to tuck into a kids’ lunchbox, though I’ll note that my kids did complain about the cranberries. Know your audience, and skip or substitute as desired!

I really love it with a limey glaze; I think the tartness is the perfect complement to the sweetness of the bread. But you can certainly leave the lime juice out if you prefer.

1 c. shredded carrots (easiest in food processor)
2 large eggs
1/2 c. vegetable oil
1/2 c. Greek yogurt or sour cream
1/2 c. grated coconut (not sweetened!)
1/2 c. chopped cashews (roasted/salted is fine)
1/2 c. dried cranberries (I like the tartness, but sultanas would be more traditional for desi flavors, and really, any dried fruit would do
1/4 c. chopped crystallized ginger
1 t. vanilla
1 1/2 c. flour
3/4 brown sugar
1 t. baking powder
1/4 t. baking soda
1/2 t. fine salt
1 t. cinnamon
1/4 t. cloves
1/4 t. nutmeg

Glaze (optional):
1/2 c. powdered sugar
1 1/2 T whole-milk yogurt
1-2 T lime juice

1. Preheat oven to 350. Spray baking pan with Baker’s Joy (or butter and flour the pan). You can use various pans: mini-muffin, muffin, mini-loaf, loaf; just adjust the timing appropriately.

2. In a large bowl, combine the carrots, eggs, oil, yogurt / sour cream, coconut, cashews, dried fruit, ginger, and vanilla.

3. In another bowl, mix together the flour, sugar, baking powder, baking soda, salt, cinnamon, cloves, and nutmeg.

4. Add dry to wet and stir with a wooden spoon until just combined. (Don’t beat too long or too vigorously.)

5. Pour the batter into the pan(s) and bake at 350 until done (test with toothpick):

Mini-muffins: 15 minutes
Muffins or mini loaves: 20-25 minutes
Loaf pan: 45-55 minutes

6. Turn onto a rack and let cool.


7. Glaze (optional): stir together the glaze ingredients and drizzle over the top of the bread. Enjoy!

(Once cooled, may be frozen for up to six months.)

Hoppers / Appam

If I had to pick the perfect Sri Lankan meal, this would be it. There’s nothing like breaking off a crisp piece of hopper, dipping it into broken egg, and scooping up some curry and a bit of seeni sambol. Delectable.

These rice flour pancakes have a unique shape; fermented batter is swirled in a special small hemispherical pan, so you end up with a soft, spongy center, and lacey, crispy sides — that contrast is the true glory of the hopper. Typically you’d make one egg hopper per person, plus another plain hopper or two, and maybe a sweet hopper to finish up.

If you don’t have a hopper pan, you can make hoppers in a regular frying pan; you just won’t get quite as much of the crispy sides. It’s a little time-consuming to make hoppers, since each one must be individually steamed for a few minutes, but with practice, you can have four hopper pans going on a stove at once. I’d recommend starting with just one pan at a time, though! Serve with curry and seeni sambol.

2 cups South Asian white or red   rice flour (or a mix of rice and wheat flour)
1 tsp sugar
pinch of baking powder
1/2 tsp salt
2 cups coconut milk
eggs for egg hoppers
extra coconut milk and jaggery for sweet hoppers

1. Mix first five ingredients thoroughly in a large bowl, cover, and set in a warm, turned-off oven to ferment overnight. (In a cold climate, fermentation may not occur without a little help—I turn my oven on to 250 degrees, and when it’s reached temperature, turn it off and put the covered bowl in the oven to stay warm.)

2. Mix again, adding water if necessary to make a quite thin, pourable batter.

3. Heat pan (grease if not non-stick) on medium, and when it’s hot, pour about 1/3 cup batter into the center. Pick up the pan immediately and swirl the batter around, coating the cooking surface. The sides of the hopper should end up with holes in them: thin, lacy, and crisp – if the batter is coating the pan more thickly, mix in some hot water to thin it down. Cover and let cook for 2-4 minutes — you’ll know it’s ready when the sides have started to brown and the center is thoroughly cooked. A silicone spatula will help with getting the hopper out of the pan.

4. For egg hoppers, after swirling, crack an egg in the center before covering. The egg will cook as the hopper does, finishing in about 3-4 minutes.


5. For sweet hoppers, after swirling, add a tablespoon of coconut milk and a teaspoon of jaggery to the center of the pan, then cook as usual.

If you don’t use all the batter right away, you can store it in the fridge, but it will keep rising, so make sure there’s some room in your storage container for that, and then you’ll want to thin it back down to pouring consistency with another 1/4 – 1/2 c. of water before use.

NOTE:  If you use instant hopper mix, I found that a packet (about 3 cups of mix) used 2 cans of coconut milk plus 2 – 2 1/2 cups of water.

Experiments in Browning

I have a friend whose daughter is allergic to eggs, which led me to wonder about the classic egg wash, used to add lovely color to breads.  I did a little research, and learned that you can do a wash with egg whites only, with heavy cream, even just with milk (done when funds are tight).

In this first photo, the curry buns on the left were baked with no wash at all; the ones on the right with a traditional egg wash.  Interestingly, the bottom left one did brown a little, but certainly you got a more consistent, richer result from the egg wash.

Then I tried using just whites, and just heavy cream.  The whites browned almost as well as the traditional egg wash; the heavy cream gave a little color, but I’m not sure it’s enough that I’d bother with it, honestly.

No real conclusions here — but it was fun experimenting!