Seeni Sambol Appetizer Experiment #4: Patties!

And we have a winner — seeni sambol & egg patties.  They are so, so good.  I took our standard Sri Lankan patty dough, rolled it thin, cut circles, all the way you would for typical chicken patties.

I did some extra small, to see how they’d come out, and they were very cute when fried, and a nice little snack — I ate some on the flight today, and they were lovely with tea at room temperature.  (I also tried baking one, and it was, I’m afraid, pretty eh.  They want frying.)

But when they’re that small, there isn’t room for egg, and I wanted the unctuousness of the egg balancing the intensity of the seeni sambol.  So I went back up to typical patty size (which is just fine for a tea or cocktail party anyway), filled it with seeni sambol and a sixteenth of a boiled egg (you could do an eighth, but I wouldn’t recommend anything bigger), folded it and crimped it up.  (I tried making one that was round, which was a fun experiment, but I didn’t like it as well as the classic patty shape.)

Then, for a little added color and zing, I brushed it all with an egg wash, and then deep-fried it.  It. was. perfect.  I’ll write the recipe up properly the next time I make it; all the experimenting meant that I wasn’t up for measuring everything until I knew which was the winning approach.  Maybe for New Year’s!

But in the meantime, if you know how to make patties already, it’s very easy to adapt for seeni sambol.  Leave out the Maldive fish if you like, and your vegetarian friends will thank you for this delectable little snack.


Seeni Sambol Appetizer Experiment #2: Buns

As we discussed possible containers for the seeni sambol, Kevin advocated for buns — which, fair enough, is actually traditional.  Seeni sambol buns can be found sold in roadside stands across Sri Lanka, so obviously, people like them.

But there was a problem — those buns were too big for cocktail / tea party.  Could I make mini buns instead?

The answer was yes — I made the buns half-size (which, if you use my mas paan recipe, means that you’ll end up with 60 little buns), which was just big enough that you could dollop a teaspoon of seeni sambol and an eighth of a hard-boiled egg into the center, before closing them up.


The end result was just fine, I’d say, and I would be happy to serve them to people.  This would be a great option for taking them on the road as a snack, as they’re nicely closed up and will keep well.  You should even be able to freeze them, I think, though I haven’t tried that, and I’m not positive what the cooked egg would do.  I also tried slashing the top in a criss-cross pattern, which makes for a more interesting presentation for a cocktail / tea, and lets you see a little bit of the bun.

Overall, I’d grade these as a B+.

But I was pretty sure I could do better…

Seeni Sambol Appetizer Experiment #1: Wontons

I’m a little obsessed with seeni sambol, the Sri Lankan traditional accompaniment of caramelized onions, cooked long and dark with tamarind and chili — made vegetarian if you like, but even tastier, I have to say, with some dried Maldive fish simmered in.  The perfect accompaniment to an egg hopper — but egg hoppers are actually kind of a pain to make, especially for a party, as you have to cook each one individually and steam them slowly.  And they’re not bite-size  treats — I wondered how I could introduce my American friends to the glory of seeni sambol at a cocktail party or tea.  And thus, we set out on our quest — to create the perfect seeni sambol appetizer.

The first attempt was, I’m sad to say, a failure.  I was in a hurry, cooking a lot of things for our holiday party, and so I went for the simplest option available — pre-made wonton shells from the grocery store, filled with seeni sambol.  They were…all right, I suppose?  The wonton shells felt wrong, though; they were too crispy, and they didn’t meld with the sambol.  Adding some cooked egg helped — that was definitely the right flavor the seeni sambol needed to mellow the pungency and make a rich, yummy bite.  But I didn’t think the wontons were the right container.  I’d have to try something else.


Also, when I tried pre-filling the wontons and refrigerating them, the seeni sambol gave off oil that discolored the wontons and made them a little greasy to pick up.  Not ideal.  If you really want to go with the wonton option, fill them right before serving.

Autumn Ribbons

This isn’t so much of a recipe, as a test of whether I’ve managed to automate posting to Facebook from this site.  But here’s a picture of the classic ribbon sandwiches, made with just beets and carrots (leaving out the traditional spinach), on wheat bread, for a more autumnal look.  Nice for a Thanksgiving party appetizer!

Love Cake

(Second recipe with this photo!)
 
Love Cake
(two hours, including baking time; serves dozens)
 
Some say this Portuguese-derived cake was baked to win the hearts of suitors, while others say it’s because of the labor of love involved in all the cutting, chopping and grinding of the fruits, nuts, and spices (much easier these days with access to a food processor). But regardless, it tastes like love: sweet, tangy, and fragrant. My mother says it doesn’t taste right without the crystallized pumpkin, which you can find at Indian grocery stores, though honestly, I like it just as well with the candied ginger. A perfect accompaniment to a cup of tea.
 
8 ounces butter, softened, plus more for greasing
16 ounces raw unsalted cashews
10 ounces fine granulated sugar
10 egg yolks
Zest of two limes
Zest of one orange
Juice of two limes
1 tsp ground cinnamon
1/2 tsp ground cardamom
1/4 tsp ground clove
1/4 tsp ground nutmeg
1/2 cup honey
3 drops rosewater extract (or two teaspoons rosewater)
1 teaspoon vanilla extract
12 ounces semolina, toasted
3 ounces candied ginger and/or crystallized pumpkin, minced as finely as possible
5 egg whites
Confectioners’ sugar for dusting (optional)
 
1. Preheat the oven to 250. Grease a 9×13 baking dish with butter and line it with two layers of parchment paper. Grease the paper with butter.
 
2. In food processor, grind cashews to coarse meal.
3. In a standing mixer (paddle attachment), beat 8 oz butter and granulated sugar until creamy. Add egg yolks and mix well. Add zest, juice, spices, honey, rosewater and vanilla; mix well.
 
4. Add semolina and mix well; add cashews and candied ginger / pumpkin and mix well.
 
5. In a separate bowl, beat egg whites until stiff; fold gently into cake mixture.
 
6. Spoon batter into prepared pan; bake for 1 hour 15 minutes, until firm to the touch. (Alternatively, spoon into buttered & floured (Baker’s Joy makes this easy) mini tea cake molds (Nordicware made the excellent one I used for this) and bake for about 40 minutes.)
 
7. Let cool completely in the pan, dust with confectioner’s sugar (optional), cut into squares and serve.

Milk Toffee

(I have two food items in one photo. I could put both recipes together, but I think it makes more sense to just post the photo twice.)
 
Milk Toffee / Pal Tofi
(30 minutes + cooling time, serves dozens)
 
This is a classic Sri Lankan dessert, but this particular recipe was originally my aunt’s. It’s one of my favorites, very sweet, with a great crystalline texture than melts in your mouth (a little reminiscent of maple candy in that regard). I’ve re-made it several times now, with a candy thermometer, trying to pin down exact measurements. The dessert is remarkably similar to New Orleans pralines (cashews instead of roasted pecans, and cut into pieces, rather than dropped on wax paper), and I wouldn’t be surprised if the Portuguese brought the dessert to both regions.
 
2 cans sweetened condensed milk
1 1/2 lb sugar
1/2 can water
1/2 lb to 3/4 lb chopped cashews (it’s fine if they’re roasted / salted)
2 TBL vanilla
1 stick butter
 
1. Put sugar, water and condensed milk together on medium-high in big nonstick pot, stirring briefly to combine. (It doesn’t have to be nonstick, but it will be easier to clean afterwards.) Watch carefully, without stirring. While mixture is cooking, grease a 9 x 12 glass baking dish or cake pan with butter; also prepare an oiled spatula for later.
 
2. When the mixture starts boiling over (around 225 on a candy thermometer), lower heat to medium. Cook for about 10 minutes (no need to stir at this point). When it starts to thicken (watery thickness), add cashews and stir. When it thickens a bit more, add vanilla and stir (it will fizz up a bit at this). Stir slowly and constantly from this point forward.
 
3. When it starts sticking to the pan / pulling away from the sides (soft-ball stage, 235 degrees), add 1 stick of butter and mix it in. As soon as the butter melts, take pot off stove and pour immediately into buttered pan, using an oiled spatula to get it all out. It should smooth out on its own. (Be careful pouring, as candy syrup will burn you badly!)
 
4. It will still be too soft to cut. Let cool for at least 30 minutes, then try cutting it with an oiled knife. If it doesn’t stick to your knife, you can cut it into pieces; small squares are traditional. Enjoy!
 

Mackerel (or Ground Beef, or Vegetable) Cutlets

Mackerel (or Ground Beef, or Vegetable) Cutlets

(90 minutes, makes about 50)

There’s a part of my mind (formed in childhood over monthly Sri Lankan birthday parties at various aunties’ homes) that says a party isn’t properly a party unless there are rolls and cutlets. So when people agree to come over to my house and let me feed them rolls and cutlets, it makes that childhood bit of me very happy.

Some Americans find these too fishy, but I love them. Over the years, my family has come up with adaptations to suit the tastes of those (like Kevin) who dislike fish, and they’ve even come up with a variation for vegetarians. But honestly, the mackerel ones are the tastiest.

I wouldn’t recommend attempting this recipe unless you’re willing to get your hands dirty (and fishy-smelling)—you really need to work the filling with your hand to blend and shape it properly.

2 cans of mackerel, 15 oz each

2 large russet potato

4 medium onions, chopped fine, for sautéing

1 tsp black mustard seed

1 tsp cumin seed

2 TBL oil or ghee

1 rounded tsp salt

2/3 cup lime juice

2 small onions, minced, for mixing in

4 rounded tsp finely chopped fresh Thai green chilies

1 rounded tsp ground black pepper

2 egg, beaten

dry breadcrumbs, for coating

oil for deep frying

  1. Drain fish thoroughly, removing as much liquid as possible. While fish are draining, boil the potatoes, peel, and mash them. Clean the fish, removing scales and bones, and break it into small pieces.
  2. Sauté the four fine-chopped medium onions in oil with cumin and black mustard seed until golden-translucent. Add fish, salt and lime juice, then cook until very dry (this process reduces the fishy smell, and the drier you get the mixture, the less excess oil they’ll pick up when frying). Let cool.
  3. Using your clean hand, mix thoroughly the fish, mashed potatoes, the two small minced raw onions, black pepper, and chilies until a fairly smooth paste. Shape the mixture into small balls, about the size of a cupped palm. I squeeze the mixture in my balled hand as I go, compressing so the resulting ball is nice and firm—that helps it keep its form when frying. (You can pause, cover with plastic wrap, and refrigerate at this point if making a day or two ahead.)
  4. Roll each ball in beaten egg, and then roll each ball in the dry breadcrumbs. (You can freeze at this point if making ahead—spread them out on a flat cookie sheet so they’re not touching and freeze them—once frozen, you can pack them more tightly in gallon ziploc bags, and they should hold their shape. They’ll be fine in the freezer for weeks, which helps when you’re prepping for a big party; you can either fry them frozen or spread them out on plates and let them thaw first.)
  5. Fry a few at a time in deep hot oil over medium-high heat—not too hot, or they’ll start to break apart! This should take a minute or so each. When well-browned, lift out with a slotted spoon and drain on a metal rack placed over a tray lined with a few layers of paper towels. 

For ground beef cutlets: For 2 lb lean ground beef, when you sauté the 4 chopped onions, add 1-2 heaping tsp red Indian chili powder and 1/2 cup ketchup, as well as the 1/2 rounded tsp salt from above. Add the ground beef (skipping the lime juice), and fry until very dry, draining any excess oil. Skip the raw onion, chilies and black pepper—proceed otherwise as for the fish cutlets.

For vegetable cutlets: Just use 1 lb frozen mixed vegetables, thawed (you might have to cut up the green beans into smaller pieces). Sauté the onions, mustard seed, and cumin seed as for the fish; add the vegetables and salt and cook until very dry. Skip the raw onion if you like, but definitely stir in an extra 1/2 tsp of salt when you mix the veggies in with the potatoes, black pepper and chilies. Proceed otherwise as for the fish cutlets.

Marshmallows

Marshmallows
(45 minutes + cooling time, serves dozens)
 
Homemade marshmallows are so much better than store-bought — there’s just no comparison. Store-bought is tasty enough for dunking in hot chocolate or toasting over a fire, but these, I happily devour, straight up. This is based on Alton Brown’s recipe, which is pretty identical to traditional Sri Lankan marshmallow recipes, and probably marshmallow recipes the world over, but his offers slightly more precision. We traditionally make these at Christmas, and often color the marshmallows for extra festivity.
 
It is much easier to make this recipe with a candy thermometer, or with some practice making candies and knowing how to test for soft ball stage.
 
3 packages unflavored gelatin
1 cup water, divided
1 1/2 cups granulated sugar
1 cup light corn syrup
1/4 teaspoon salt
1 teaspoon vanilla extract (or 1/8 tsp rose extract)
baker’s sugar (or confectioner’s sugar)
Nonstick spray (but not the butter kind, as it will be noticeably yellow)
Pink or green food coloring (optional)
 
1. Butter a large 9 x 12 pan and dust with superfine sugar. (You can use confectioner’s / powdered sugar, but the superfine adds a pleasant subtle texture to the marshmallows. My mother would pulse granulated sugar in the food processor, so it was even less fine, and in some ways, I like that even better, with a little more crisp mouthfeel on the initial bite.) Also prepare an oiled spatula for later.
 
2. Empty gelatin packets into bowl of stand mixer (whisk attachment), with 1/2 cup water.
 
3. In a small saucepan (a bigger one will be heavy and hard to hold steadily at a later stage) combine the remaining 1/2 cup water, granulated sugar, corn syrup, and salt. Cover and cook over medium high heat for 4 minutes. Uncover and cook until the mixture reaches soft ball stage (240 degrees if you have a candy thermometer), approximately 8 minutes. Once the mixture reaches this temperature, immediately remove from heat; if it continues, it will swiftly turn into hard candy.
 
4. Turn mixer on low speed and, while running, slowly pour the sugar syrup down the side of the bowl into the gelatin mixture. (Be very careful with the sugar syrup, as it is scaldingly hot and will burn you badly if it gets on your skin.) Once you’ve added all of the syrup, increase the speed to high.
 
5. Continue to whip until the mixture becomes very thick and is lukewarm, approximately 12 minutes. Add food coloring, if using for the whole batch, during this stage. Add vanilla (or rose) during the last minute of whipping. (If adding rose extract, be careful — it’s very strongly flavored, and too much will ruin the sweets. Err on the side of caution.)
 
6. Pour the mixture into the prepared pan, spreading it evenly (and swiftly) with an oiled spatula. (For bicolored marshmallows, pour the white half first, spread quickly, then add color and re-whip the other half, then pour over the white, spreading as needed. It won’t be perfectly even, but that’s fine.)
 
7. Dust the top with enough of the remaining superfine sugar to lightly cover. Reserve the rest for later. Allow the marshmallows to sit uncovered for at least 4 hours and up to overnight.
 
8. Turn the marshmallows out onto a cutting board and cut into diamond shapes (traditional). As you’re cutting, lightly dust all sides of each marshmallow with the remaining superfine sugar, using additional if necessary. May be stored in an airtight container for up to 3 weeks, or frozen.

Chinese Rolls

Chinese Rolls
(3 hours, makes 50)

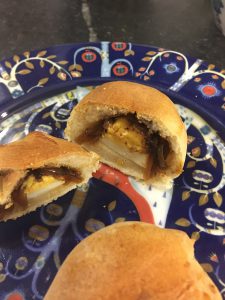
Chinese rolls (whether made with meat, chicken, or vegetarian) are an essential Sri Lankan party food. People look forward to them with anticipation, and greets their arrival with glee. They’re also a sign of love—in college and after, whenever I visited home, my mother or one of my aunts would make sure that when I left again, it was with a bag of freshly-fried rolls. It was sometimes a little challenging managing the still-steaming bag on the airplane, but it was the sort of gift that was impossible to turn down—made with love and labor, and eventually consumed with delight.

I believe they’re called Chinese rolls because they look a little like Chinese egg rolls; during colonial times, Chinese laborers were brought to Sri Lanka and settled there in a small but significant minority community; I assume this dish was invented then. They taste nothing like egg rolls, though.

Growing up, my sisters and I would often be pressed into service for the various stages of roll-making, all sitting around the dining table and working. My mother and aunts made them in a group as well. Especially if doing a larger batch, I highly encourage cooking this dish as a group activity (perhaps inviting a few select friends to come a few hours before your party), which will speed things up by as much as an hour. The final step is best done right before serving.

Portion and serving suggestion:
For a cocktail or other large-ish party, I’d aim for two rolls per guest. It’s a filling, rich treat. The recipes scales up or down easily—my mother would generally make 200 at a time, or more, for the Sri Lankan-American parties of my childhood, when immigrant families would gather, hungry for a taste of home. The dish is complex and labor-intensive enough that I woudn’t normally make rolls for a small dinner party, but you certainly could serve them as an appetizer, allowing two per person. Simply divide the recipe as needed.

Note: There are several points in the process where you can pause, refrigerate or freeze, and pick up again later. This is tremendously helpful when prepping for a party—you can do the bulk of the work days, weeks, or even months in advance, as long as you plan appropriately.
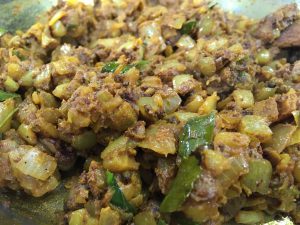
For the filling:
6 medium onions, chopped fine
1/4 cup vegetable oil + 1/2 cup vegetable oil
1/4 tsp black mustard seed
1/4 tsp cumin seed
1-2 TBL red chili powder
1 TBL Sri Lankan curry powder
2 lbs ground beef (or goat, or chicken)
1/3 cup ketchup
3 TBL Worcestershire sauce
1 tsp salt + 1 tsp salt
3 medium russet potatoes, diced in roughly 1/2-inch cubes

(Note: for a vegetarian filling, see the cutlets recipe.)

For the crepes:
4 cups cold water
2 cups milk
2 tsp salt
2 eggs
4 cups of all-purpose flour

For frying:
2 eggs
2 cups breadcrumbs
4 cups vegetable oil

1. In a large frying pan, sauté onions in 1/4 cup oil on medium-high with mustard seed and cumin seeds until onions are golden/translucent (not brown). Add chili powder and cook 1 minute. Immediately add curry powder, ground beef, ketchup, Worcestershire sauce, and 1 tsp salt. Sauté until cooked through. Drain any excess oil, transfer to a large bowl, and let cool. (You can refrigerate for a few days or freeze for up to six months here.)

2. In a clean frying pan, heat 1/4 cup oil and fry potato cubes with 1 tsp salt on medium-high, stirring, until cooked through. Drain any excess oil and let cool. (You can refrigerate or freeze here—to best preserve potato texture for freezing, spread them out in a flat sheet and freeze, then transfer to large plastic sealable bags.)

3. Combine meat and potato mixture. (You can refrigerate or freeze here.)

4. Make crepes: Combine crepe filling ingredients and mix thoroughly until it forms a thin pancake batter. Heat an 8-inch non-stick frying pan and grease with a little oil between each pancake. Pour a ladle full of batter into the pan and swirl it around gently until it forms a thin pancake. Cook until set without browning; flip and briefly cook other side. Remove and stack on a plate. (If you have a friend with you, you can do steps 4 and 5 together, one making the crepes while the other fills.)

5. Place a cooked pancake on a plate and add about 2 TBL of filling. Proceed to roll the pancake like an egg-roll. Note: Try eating one or two at this stage (not required, but recommended, as there’s something deliciously unctuous about them, and I always used to steal some at this point when rolling for my mom).

7. In a small bowl, beat 2 eggs. Set up a plate piled with bread crumbs. Dip rolls in egg mixture, then roll in breadcrumbs, then remove to a separate plate. (Don’t pile them up, as they’ll squish — use multiple clean plates.) Continue until all rolls are encased in bread crumbs.

8. Heat vegetable oil in a large pan until quite hot, then, using a Chinese spider (recommended) or spatula, fry until golden, removing to separate plates lined with paper towels. (I usually turn the heat down a little after the first batch, which helps avoid burning them.) Serve hot as an appetizer, with a little spicy sauce (MD sauce can be found online, and is a classic choice) as accompaniment if desired.

Chicken Patties

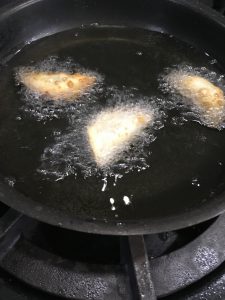
I ran out of canola oil while setting up to deep-fry these; luckily Kat (who lives across the way) had some coconut oil she could send over with a child. So I fried in a combo of the two, which I think was perhaps perfect — the canola gave the characteristic crispiness, and the coconut gave some extra richness. I hadn’t fried in coconut oil before, though, and was really surprised when I put the first patty in — it foamed up dramatically (which may have had something to do with combining the two oils — I’m not sure)! I called Kevin over to make sure I wasn’t doing something wrong. But all was very well, and they were soon devoured. (Pictured below is a double-batch, filling three plates.)
 
Patties (usually Chicken)
(2 hours, makes about 30)
 
These are classic party appetizers (or short-eats, as we call them); patties can also be made with a mix of meats — chicken, beef and pork work well together. The filling may be made in advance and frozen if desired, or you can go all the way to filling the patties and then freeze them in layers, with sheets of parchment paper to separate, before the final frying step. That makes it easier to manage prep for a big party. Allow patties to thaw completely before frying.
 
Patty pastry:
2 cups plain flour
1/2 rounded tsp salt
3 TBL butter
1/4 cup thick coconut milk
2 egg yolks, beaten
peanut oil for frying
 
Filling:
2 1/2 lbs boneless chicken thighs
2 TBL ghee or oil
1 medium onion, finely chopped
8 curry leaves, on the stalk if possible
2 rounded tsp Sri Lankan curry powder
1 rounded tsp ground turmeric
1/4 rounded tsp ground cloves
1/4 rounded tsp ground cinnamon
1/2 rounded tsp ground black pepper
2 rounded tsp salt
2 strips lemon rind (or roughly that amount of lemongrass)
1/2 cup thick coconut milk
1-2 lightly-beaten egg whites for sealing pastry
 
1. Make filling. Put chicken into a saucepan with just enough water to cover, bring to a boil, cover and simmer for 20 minutes. Cool chicken, remove from pot (reserving stock), and mince. (In a food processor is fine.)
 
2. Heat ghee in a saucepan and fry the onion and curry leaves until onion is soft and starts to brown. (Leaving curry leaves on the stalk will make it easier to remove them at the end.) Add the curry powder, turmeric, cloves, cinnamon, pepper, and salt and stir well. Add about 1 1/2 cups of the leftover stock. Add lemongrass and the minced chicken. Mix well and simmer gently until chicken is tender and liquid almost evaporated.
 
3. Add coconut milk, stir, and cook uncovered until coconut milk is absorbed.
 
4. Remove from heat. When cool, pick out the lemon rind or lemongrass and the curry leaves.
 
5. Make pastry: Sift flour and salt into a bowl and rub in the butter with your fingertips. Add the coconut milk and egg yolks mixed together and knead lightly to a smooth dough. If necessary, add a little extra milk or flour.
 
6. Wrap dough in parchment paper and chill for 30 minutes.
 
7. Take one quarter of the dough at a time and roll out very thinly on lightly floured board. Cut into circles using a large cookie cutter about 3 inches in diameter.
 
8. Put a teaspoonful of the filling on the pastry rounds. Wet the edges of the pastry with egg white, fold over to make half circle and press edges firmly together to seal. Ornament the edge by pressing with a key or the tines of a fork.
 
9. When all the patties are made, fry a few at a time in deep hot oil. Drain on layers of paper towels and serve warm. Can be made ahead and refrigerated (or frozen)—reheat in a 350 degree oven.