Fizzy Ginger Beer-Lime-Arrack Marshmallows

(45 minutes + cooling time, serves dozens)

Inspired by a classic Sri Lankan cocktail made with ginger beer, lime, and arrack, a bourbon-like liquor derived from coconut flowers.

3 packages unflavored gelatin
1/4 c. ginger juice
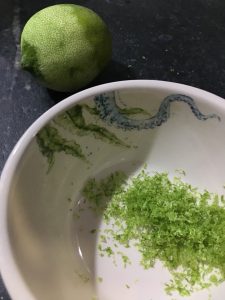
1/4 c. lime juice
1/2 cup water
1 1/2 cups granulated sugar
1 cup light corn syrup
1/4 teaspoon salt
1/4 c. ginger beer
1/4 c. arrack
powdered (confectioner’s) sugar
butter (for greasing the pan)
green food coloring (optional)
1/2 c. culinary crystals (optional)
crystallized ginger, chopped fine (optional)
crystallized lime, cut into thin wedges (optional)

1. Empty gelatin packets into bowl of stand mixer (whisk attachment), with ginger juice and lime juice. Stir briefly to combine.

2. In a small saucepan (a bigger one will be heavy and hard to hold steadily at a later stage) combine water, granulated sugar, corn syrup, and salt. Cover and cook over medium high heat for 4 minutes. Uncover and cook until the mixture reaches soft ball stage (240 degrees if you have a candy thermometer), approximately 8 minutes. Watch carefully to ensure it doesn’t overheat.

3. Add ginger beer and arrack, which will reduce the temperature; continue simmering until it returns to soft ball stage / 240 degrees. Once the mixture reaches this temperature, immediately remove from heat; if it continues, it will swiftly turn into hard candy.

4. Turn mixer on low speed and, while running, slowly pour the sugar syrup down the side of the bowl into the gelatin mixture. (Be very careful with the sugar syrup, as it is scaldingly hot and will burn you badly if it gets on your skin.) Once you’ve added all of the syrup, increase the speed to high.

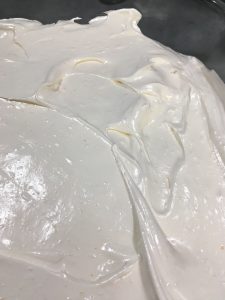
5. Continue to whip until the mixture becomes very thick and is lukewarm, approximately 12 minutes. Add food coloring, if using, during this stage.

6. While it’s whipping, butter a large 9 x 12 pan and dust with powdered sugar. Prepare an oiled spatula.

7. Turn mixer to low and add culinary crystals, stirring for a few moments to blend. Pour the mixture into the prepared pan, spreading it evenly (and swiftly) with an oiled spatula.

8. Top with crystallized ginger and lime if desired, pressing in slightly. Dust the top with enough of the remaining powdered sugar to lightly cover. Reserve the rest for later. Allow the marshmallows to sit uncovered for at least 4 hours and up to overnight.

9. Turn onto a board, cut into squares and dust all sides of each marshmallow with the remaining powdered sugar, using additional if necessary. May be stored in an airtight container for up to 3 weeks, or frozen.

Ginger-Lime Marshmallows

(45 minutes + cooling time, serves dozens)

You can freeze ginger, grate it with a microplane grater, and then squeeze juice out of the grated ginger, but that’s pretty labor intensive for this much juice. I used Ginger People’s ginger juice, available online.

3 packages unflavored gelatin
1/4 c. ginger juice
1/4 c. lime juice
1 1/2 cups granulated sugar
1 cup light corn syrup
1/2 cup water
1/4 teaspoon salt
powdered (confectioner’s) sugar
butter (for greasing the pan)
green food coloring (optional)
crystallized ginger, chopped fine (optional)

1. Empty gelatin packets into bowl of stand mixer (whisk attachment), with ginger juice and lime juice. Stir briefly to combine.

2. In a small saucepan (a bigger one will be heavy and hard to hold steadily at a later stage) combine water, granulated sugar, corn syrup, and salt. Cover and cook over medium high heat for 4 minutes. Uncover and cook until the mixture reaches soft ball stage (240 degrees if you have a candy thermometer), approximately 8 minutes. Once the mixture reaches this temperature, immediately remove from heat; if it continues, it will swiftly turn into hard candy.

3. Turn mixer on low speed and, while running, slowly pour the sugar syrup down the side of the bowl into the gelatin mixture. (Be very careful with the sugar syrup, as it is scaldingly hot and will burn you badly if it gets on your skin.) Once you’ve added all of the syrup, increase the speed to high.

4. Continue to whip until the mixture becomes very thick and is lukewarm, approximately 12 minutes. Add food coloring, if using, during this stage.

5. While it’s whipping, butter a large 9 x 12 pan and dust with powdered sugar. Prepare an oiled spatula.

6. Pour the mixture into the prepared pan, spreading it evenly (and swiftly) with an oiled spatula.

7. Sprinkle chopped crystallized ginger on top, pressing in slightly. Dust the top with enough of the remaining powdered sugar to lightly cover. Reserve the rest for later. Allow the marshmallows to sit uncovered for at least 4 hours and up to overnight.

8. Turn onto a board, cut into squares, and dust all sides of each marshmallow with the remaining powdered sugar, using additional if necessary. May be stored in an airtight container for up to 3 weeks, or frozen.

Bloody Passion Marshmallows

(45 minutes + cooling time, serves dozens)

Love the tang of the blood orange here, cutting the fruity sweetness of the passionfruit marshmallows

3 packages unflavored gelatin
1/2 cup water
1/4 c. passionfruit puree (from frozen is fine)
1/4 c. blood orange juice (about one orange)
1 1/2 cups granulated sugar
1 cup light corn syrup
1/4 teaspoon salt
powdered (confectioner’s) sugar
butter (for greasing the pan)
yellow or orange food coloring (optional)
red food coloring for marbling (optional)

1. Empty gelatin packets into bowl of stand mixer (whisk attachment), with passionfruit puree and blood orange juice. Stir briefly to combine.


2. In a small saucepan (a bigger one will be heavy and hard to hold steadily at a later stage) combine water, granulated sugar, corn syrup, and salt. Cover and cook over medium high heat for 4 minutes. Uncover and cook until the mixture reaches soft ball stage (240 degrees if you have a candy thermometer), approximately 8 minutes. Once the mixture reaches this temperature, immediately remove from heat; if it continues, it will swiftly turn into hard candy.


3. Turn mixer on low speed and, while running, slowly pour the sugar syrup down the side of the bowl into the gelatin mixture. (Be very careful with the sugar syrup, as it is scaldingly hot and will burn you badly if it gets on your skin.) Once you’ve added all of the syrup, increase the speed to high.

4. Continue to whip until the mixture becomes very thick and is lukewarm, approximately 12 minutes. Add food coloring, if using for the whole batch, during this stage.

5. While it’s whipping, butter a large 9 x 12 pan and dust with powdered sugar. Prepare an oiled spatula for later.

6. Pour the mixture into the prepared pan, spreading it evenly (and swiftly) with an oiled spatula. (You can add a few drops of red food coloring and drag a knife through them, to create a marbled effect.)

7. Dust the top with enough of the remaining powdered sugar to lightly cover. Reserve the rest for later. Allow the marshmallows to sit uncovered for at least 4 hours and up to overnight.

8. Turn onto a board, cut into squares and dust all sides of each marshmallow with the remaining powdered sugar, using additional if necessary. May be stored in an airtight container for up to 3 weeks, or frozen.


Chocolate-Dipped Passionfruit Marshmallows

(45 minutes + cooling time + 30 minutes for dipping, serves dozens)

I’d start these the day before you want them finished, because you need to let them cool for quite a while before cutting and dipping (and then they’ll need maybe 30 more minutes before serving). But not too much in advance, because homemade marshmallows maintain texture best when fresh (though they can keep for about three weeks in a sealed container, or can even be frozen). Plan appropriately!

3 packages unflavored gelatin
1/2 cup water
1/2 c. passionfruit puree (from frozen is fine)
1 1/2 cups granulated sugar
1 cup light corn syrup
1/4 teaspoon salt
powdered (confectioner’s) sugar
butter (for greasing the pan)
yellow or orange food coloring (optional)
10 oz. bittersweet chocolate, chopped or chips

1. Empty gelatin packets into bowl of stand mixer (whisk attachment), with passionfruit puree. Stir briefly to combine.

2. In a small saucepan (a bigger one will be heavy and hard to hold steadily at a later stage) combine water, granulated sugar, corn syrup, and salt. Cover and cook over medium high heat for 4 minutes. Uncover and cook until the mixture reaches soft ball stage (240 degrees if you have a candy thermometer), approximately 8 minutes. Once the mixture reaches this temperature, immediately remove from heat; if it continues, it will swiftly turn into hard candy.

3. Turn mixer on low speed and, while running, slowly pour the sugar syrup down the side of the bowl into the gelatin mixture. (Be very careful with the sugar syrup, as it is scaldingly hot and will burn you badly if it gets on your skin.) Once you’ve added all of the syrup, increase the speed to high.

4. Continue to whip until the mixture becomes very thick and is lukewarm, approximately 12 minutes. Add food coloring, if using for the whole batch, during this stage.

5. While it’s whipping, butter a large 9 x 12 pan and dust with powdered sugar. Prepare an oiled spatula for later.

6. Pour the mixture into the prepared pan, spreading it evenly (and swiftly) with an oiled spatula.

7. Dust the top with enough of the remaining powdered sugar to lightly cover. Reserve the rest for later. Allow the marshmallows to sit uncovered for at least 4 hours and up to overnight.

8. Turn the marshmallows out onto a cutting board and cut into squares. As you’re cutting, lightly dust all sides of each marshmallow with the remaining powdered sugar, using additional if necessary. May be stored in an airtight container for up to 3 weeks, or frozen. They’re delicious straight up at this point, if you don’t want to dip them.

9. Dip in melted chocolate chips (melt in microwave on 50% power for a few minutes, in 30 second bursts, stirring in between); add sprinkles if desired, then lay on wax paper to dry for about 30 minutes.

Passionfruit & Vanilla Bean Marshmallows

(45 minutes + cooling time, serves dozens)

Using vanilla bean gives a strong vanilla flavor — you can cut the amount in half if you’d prefer it milder, or leave it out entirely.

3 packages unflavored gelatin
1/2 cup water
1/2 c. passionfruit puree (from frozen is fine)
1 vanilla bean, split and the seeds scraped out
1 1/2 cups granulated sugar
1 cup light corn syrup
1/4 teaspoon salt
powdered (confectioner’s) sugar
butter (for greasing the pan)
yellow or orange food coloring (optional)

1. Empty gelatin packets into bowl of stand mixer (whisk attachment), with passionfruit puree. Stir briefly to combine.

2. In a small saucepan (a bigger one will be heavy and hard to hold steadily at a later stage) combine water, granulated sugar, corn syrup, vanilla bean seeds, and salt. Cover and cook over medium high heat for 4 minutes. Uncover and cook until the mixture reaches soft ball stage (240 degrees if you have a candy thermometer), approximately 8 minutes. Once the mixture reaches this temperature, immediately remove from heat; if it continues, it will swiftly turn into hard candy.

3. Turn mixer on low speed and, while running, slowly pour the sugar syrup down the side of the bowl into the gelatin mixture. (Be very careful with the sugar syrup, as it is scaldingly hot and will burn you badly if it gets on your skin.) Once you’ve added all of the syrup, increase the speed to high.

4. Continue to whip until the mixture becomes very thick and is lukewarm, approximately 12 minutes. Add food coloring, if using for the whole batch, during this stage.

5. While it’s whipping, butter a large 9 x 12 pan and dust with powdered sugar. Prepare an oiled spatula for later.

6. Pour the mixture into the prepared pan, spreading it evenly (and swiftly) with an oiled spatula.

7. Dust the top with enough of the remaining powdered sugar to lightly cover. Reserve the rest for later. Allow the marshmallows to sit uncovered for at least 4 hours and up to overnight.

8. Turn the marshmallows out onto a cutting board and cut into squares. As you’re cutting, lightly dust all sides of each marshmallow with the remaining powdered sugar, using additional if necessary. May be stored in an airtight container for up to 3 weeks, or frozen.

OPTIONAL: Dip in melted white chocolate chips (melt in microwave on 50% power for a few minutes, in 30 second bursts, stirring in between), and coat in sprinkles; lay on wax paper to dry.

Mango-Lime Marshmallows

(45 minutes + cooling time, serves dozens)

These make very fluffy, mousse-like marshmallows, because there’s a component to mango that resists setting. I’m told that if you cook the mango first, it’ll set more firmly, but I like them this way!

3 packages unflavored gelatin
1/2 cup water
1/3 c. mango puree (canned is fine)
3 T lime juice
1 1/2 cups granulated sugar
1 cup light corn syrup
1/4 teaspoon salt
powdered (confectioner’s) sugar
butter (for greasing the pan)
orange food coloring (optional)

1. Empty gelatin packets into bowl of stand mixer (whisk attachment), with mango puree and lime juice. Stir briefly to combine.

2. In a small saucepan (a bigger one will be heavy and hard to hold steadily at a later stage) combine water, granulated sugar, corn syrup, and salt. Cover and cook over medium high heat for 4 minutes. Uncover and cook until the mixture reaches soft ball stage (240 degrees if you have a candy thermometer), approximately 8 minutes. Once the mixture reaches this temperature, immediately remove from heat; if it continues, it will swiftly turn into hard candy.

3. Turn mixer on low speed and, while running, slowly pour the sugar syrup down the side of the bowl into the gelatin mixture. (Be very careful with the sugar syrup, as it is scaldingly hot and will burn you badly if it gets on your skin.) Once you’ve added all of the syrup, increase the speed to high.

4. Continue to whip until the mixture becomes very thick and is lukewarm, approximately 12 minutes. Add food coloring, if using for the whole batch, during this stage.

5. While it’s whipping, butter a large 9 x 12 pan and dust with powdered sugar. Prepare an oiled spatula for later.

6. Pour the mixture into the prepared pan, spreading it evenly (and swiftly) with an oiled spatula.

7. Dust the top with enough of the remaining powdered sugar to lightly cover. Reserve the rest for later. Allow the marshmallows to sit uncovered for at least 4 hours and up to overnight.

8. Turn the marshmallows out onto a cutting board and cut into squares. As you’re cutting, lightly dust all sides of each marshmallow with the remaining powdered sugar, using additional if necessary. May be stored in an airtight container for up to 3 weeks, or frozen.

Passionate

My kitchen smells gorgeously of passionfruit. It’s Pooja Makhijani‘s fault — I was going to go to sleep, but I finished her online food writing class (first session), and just had to cook something. So, experimenting with passionfruit-vanilla marshmallows it is.

I kind of want to try to make three different kinds of passionfruit marshmallows actually:

– Vanilla Passion (with vanilla bean, and very little food coloring, so it’s nice and pale, possibly dipped in white chocolate)
– Chocolate Passion (straight-up passionfruit, but dipped in dark chocolate)
– Bloody Passion (passionfruit & blood orange)

Sweet Milk Rice with Chili-Salt-Lime Mango & Jaggery

(30 minutes, serves 4)

Sweet milk rice:
1 c. short-grain white rice
2 c. water
1 T sugar
pinch of salt
1 1/2 c. sweetened coconut milk

Chili-Salt-Lime Mango
2 c. chopped mangoes
1/2 t. fine salt
1/2 t. chili powder (cayenne)
1 t. lime juice

4 t. jaggery, grated (or brown sugar)

1. Cook sweet milk rice: Put rice with water, sugar, and salt in a saucepan. Bring to boil, then cover and turn down to a simmer; cook 15 minutes. Take off lid and stir in coconut milk; simmer uncovered until coconut milk is absorbed, about 5-10 more minutes.

2. Chop mango and mix with chili, salt, and lime.

3. Serve warm milk rice with mango and a little jaggery sprinkled on top.

(Note: Rice can be made ahead, cut into pieces, and reheated in the microwave before serving. Mango can be made ahead, and will blend a little better if you do.)

Party

I wonder if Kevin realized, back when we first started dating more than twenty-five years ago that he would, several times a year, be drafted into being support staff for massive cooking efforts. I cooked for pretty close to three days straight for this party (with a 6 hour break on Friday for teaching) — apparently, this is my version of a marathon. It is utterly exhausting (I plan to sit on the couch all day today), but also super-fun in some hard to quantify sense.

Part of it is the cooking itself — running through mostly dishes that I have made so many times that I can make them without thinking, utterly on autopilot, while mixing in a few that are stretches for me, or new experiments. Tasting to make sure I remembered the salt, and the lime juice. Finding new shortcuts — the biggest help this year was a combo: 6 bags of frozen chopped onions from Pete’s (I cleaned them out), sautéed Thursday night in big pots with cumin seed, mustard seed, and from-a-jar chopped ginger and garlic. Just dump them in the pots with some oil, bring to high, then turn it to low and let them sweat down for 45 minutes or so — you barely need to stir. My mom told me she’d started doing that recently, making the onions in advance and then just portioning them out for each curry, and it’s a huge timesaver.

A lot of the fun is the logistical challenge of it, which I kind of love — it stretches a part of my brain in enjoyable ways. My little scribbled lists are all over the place — here is the next grocery list. Here is the complete list of dishes. Here is the list of tasks for day of party, in time order. 2:00 – set out tables, chairs, and tablecloths. 2:30 – assemble fruit and veggie trays take cheese out of the fridge. 3:00 – make punch, shower and dress. 3:30 – start frying appetizers. 4:00 – party! Here is the list of tasks to hand off to other people. Four different grocery stores to get the right ingredients in three days. Planning the schedule so that everything gets done in time, and that hot things come out hot.

One microwave + one stove make this last a pretty serious element of the challenge — some of my friends have a second stove in the basement, which would definitely simplify that, but I can’t justify it for using it 2-3 times / year. So we scramble and plan a bit instead, and are grateful that Amanda is willing to take on the task of putting things into the microwave and pulling them out again, stirring and testing as she goes. In a few years, Kavi will be old enough to handle that task, but she’s not quite there yet.

The Sri Lankan appetizers (which we call ‘short eats’) are particularly labor-intensive. I could have had some catered (the rolls and cutlets, from a Sri Lankan family up near Devon), but I like mine better. So that entails several hours of additional people’s labor — Kat and Michael and Kavi on Friday night, making cutlets and crepes for the rolls, Kat and Michael again on Saturday early afternoon, egging and breading the cutlets, assembling and slicing the ribbon sandwiches, and a host of early party attendees on Saturday late afternoon, egging and breading the rolls, while I stand at the stove and fry everything.

That last is actually something I’d like to hand off, so I could be talking to guests as they arrive — but if you’re not used to deep-frying, it can be intimidating. Maybe next time, I should find a party guest in advance willing to deep-fry for me, or be sure Kevin won’t be busy with other things then. A lot of this requires delegating, which is complicated by the delegated folks’ needing the skills for it.

In twenty years, perhaps I will have trained a little coterie of locals in the subtleties of rolling cutlets and assembling rolls. Kat’s mackerel cutlets were rolled perfectly this time — honestly, she’s neater than I am. And Michael P. brings his scientist background to the ribbon sandwiches — the fillings were so finely distributed, they looked completely professional. Somehow, it all comes together in the end.